Tools we need to instal :
- Visual Studio for development tools.
- Dev Express License (Optional for better touch GUI)
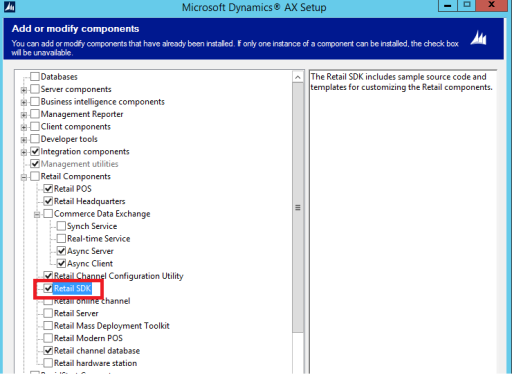
- Retail SDK (POS Source Code)
You can found Retail SDK on Dynamics AX Installation.
After installation finished you can found the source code on document folder.
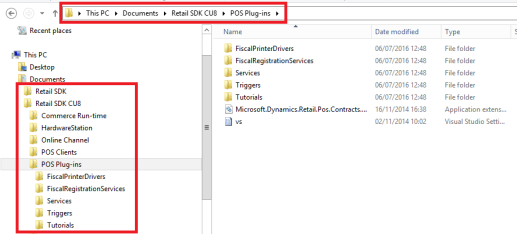
For very first time lets focus at the two folder on the POS Plug-ins, there is Services and Triggers because almost all POS function source code is on that folder.
Services: Services are actually .Net assemblies. POS implements many of the features as services using interfaces and can be modified using Visual Studio. POS loads these services at run time by calling the interfaces. So whenever you modify or extend the standard service keep the assembly name same as original so that POS can recognize it and call it at run time.
Triggers: Triggers are called before and after the operations. There are two types of triggers, Pre-triggers and Post-triggers. Pre-triggers provide a way of validation before a certain operation is executed. Post-triggers are used to respond to an operation after it has finished. You can modify the triggers same way as services.
*I use Dynamics AX 2012 R3 CU8 on this tutorial, also work for AX 2012 Feature Pack, AX 2012 R2, and AX 2o12 R3.
Create Custom Script
So first lets open the Triggers folder and double click Triggers.sln file, you will show all the triggers source code now expand on visual studio, lets pick our first function to modify.
For this tutorial we will add some function when POS starting, so lets’s open ApplicationTriggers Project and open ApplicationTriggers.cs , at this class you will found the some of methods, this methods will be calling when POS staring, for example ApplicationStart, ApplicationStop, PreLogon, PostLogon and etc.
Try to add some code at ApplicationStart method, i assume this method will be calling when POS application starting, lets add some simple script at here, let’s try add some dialog box.
1
2
3
4
5
6
7
8
9
10
11
12
13
14
| public void ApplicationStart(){ //Our Custom Script //<begin> MessageBox.Show("POS aplication starting...."); //<end> string source = "IApplicationTriggers.ApplicationStart"; string value = "Application has started"; LSRetailPosis.ApplicationLog.Log(source, value, LSRetailPosis.LogTraceLevel.Debug); LSRetailPosis.ApplicationLog.WriteAuditEntry(source, value); ... ...} |
To make the script running on the POS we need to build the project in to dll and copy the dll on POS folder.
Try to run your POS, and the message box will be showing when POS starting.
Deploy Custom Script/dll
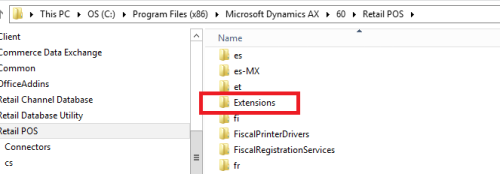
You should copy all custom *.dll files on the Extensions folder at Retail POS Folder. Don’t replace the original ones.
We can using two different Extensions Folder on POS .
1. Retail POS\Extensions
2. Retail POS\Services\Extensions
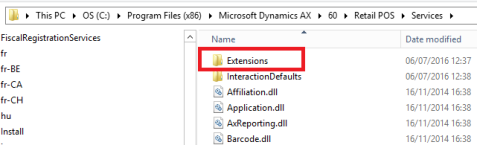
Always use the first one for custom Triggers *.dll, and second one for Services *.dll to make it easy to remember and maintenance.
Lets Starting To Debug POS Custom Code.
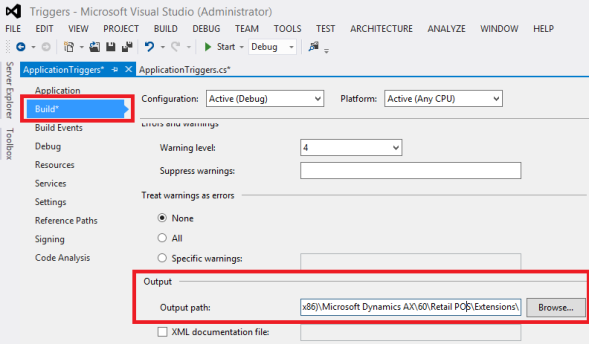
For debug the code, we can change some properties on the visual studio project, use our first sample project, right click on that project and chose Properties.
First open Build Tab on Properties UI and select the Output Path because this is Triggers so i select “C:\Program Files (x86)\Microsoft Dynamics AX\60\Retail POS\Extensions\” Folder.
And than open Debug tab, at the Start Action group select Start external program and select your POS.exe file.
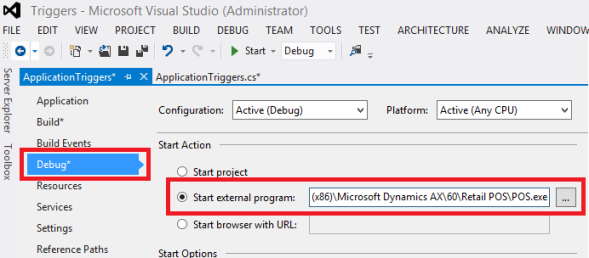
just put your break point on your custom script, and run the project using F5 or Start Button. Lets see the magic happen.
*Note: You can copy all POS Folder to your own folder to make the original POS Files safety.
Komentar
Posting Komentar